It gives you a simple process that's auditable and easy to use on mobile. You can confirm counts, add or remove items, and log reasons for adjustments. At the end, you'll review your changes and submit with confidence.
Suggested Restocking Workflow
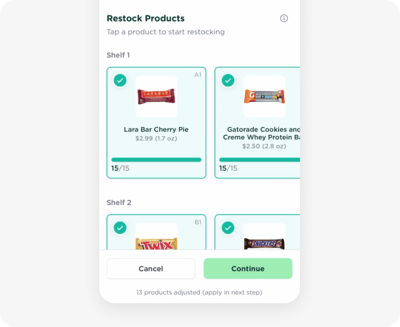
Visit platform.micromart.com on your mobile device and visit the Restocking page. There, tap to start a new restock and select your store and cabinet.
Every restock starts by tapping into a product slot.
1. Tap into a product slot
- Start by selecting a slot in the cabinet. You’ll see what the system expects to be in that spot.

2. Confirm the starting count (suggested)
- Count the actual items physically present in the slot before adding or removing stock.
- Enter that number and tap Confirm

- Why this helps:
- Keeps your stock data accurate
- Starts the audit trail with a clean baseline
- Ensures your add/remove actions are based on the true physical count
- How it's tracked:
-
- If your count differs from the expected value, it will be logged as a "confirmed count (correction)"
- If your count differs from the expected value, it will be logged as a "confirmed count (correction)"

-
- If it matches, it will be logged as a "confirmed count (matches expected)"

-
- If you skip this step, the system will use the expected count as the base and won't be logged in the audit trail
💡 If there are pending transactions, the expected system count shown may be out of sync temporarily. You can still confirm using the actual count you see, and we'll handle the pending transactions based on these counts. If you skip this step, we’ll use the expected system count.
3. Add or remove stock
- Tap Add to add new items, and increment the total count by the amount you're adding
- Tap Remove to take items out, and select a reason (expired, damaged, other)
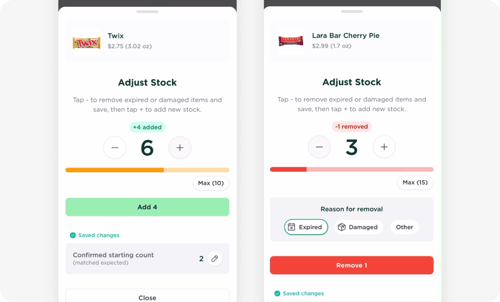
💡 All of your add and remove adjustments will be saved in your audit trail. This keeps your restocks accountable and reviewable.
4. Repeat for each slot you're restocking
- Work through every slot that needs restocking by repeating the steps above.
💡 You don't need to count for every slot, only the ones you're restocking. Any pending transactions will be handled based on whether there were confirmed physical counts.
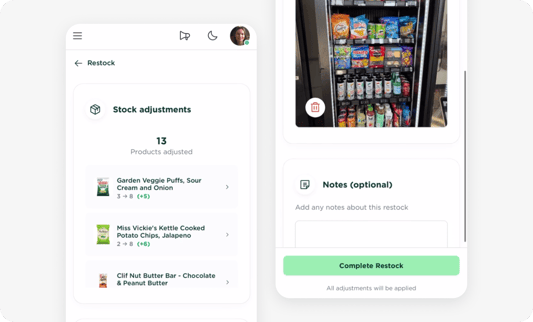
5. Review & submit
- Tap Continue
- You’ll see a full breakdown of changes
- You can also add notes and upload a cabinet photo (recommended to help with documentation, planogram verification, and product recognition)
- Tap Complete Restock to finish
- Your actions have now been saved to an audit trail that can be reviewed
In a hurry?
No problem. You don’t need to confirm counts every time.
- Just tap a slot
- Skip the count confirmation step
- Go straight to Add or Remove
You can always confirm counts another time.
💡 Some teams confirm all slots. Others spot check certain products, or confirm every so often (like once a month). Do what works best for your operation.
Still have questions? Chat with support, we’re here to help.